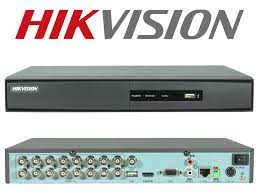
Hikvision 16 Channel DVR: Enhancing Security and Surveillance
In today’s world, security and surveillance have become paramount for both residential and commercial spaces. With the advancements in technology, there are now numerous options available to ensure the safety of your premises. One such solution is the Hikvision 16 Channel DVR, a powerful and reliable tool for comprehensive video surveillance.
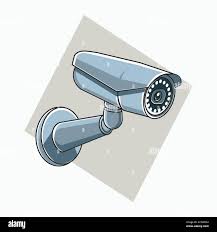
A Digital Video Recorder (DVR) is an essential component of any surveillance system as it allows you to record and store video footage from multiple cameras. The Hikvision 16 Channel DVR takes this capability to the next level by providing support for up to 16 cameras simultaneously. This means that you can monitor and record activities from various angles and locations, ensuring no blind spots are left uncovered.
One of the key features of the Hikvision 16 Channel DVR is its high-definition recording capability. With support for up to 4K resolution, this DVR ensures crystal-clear footage, allowing you to capture even the smallest details with exceptional clarity. Whether it’s identifying faces or reading license plates, this system provides a level of detail that can be crucial in investigations or evidence gathering.
Another notable feature of the Hikvision 16 Channel DVR is its advanced motion detection technology. By intelligently analyzing changes in the video feed, it can detect suspicious movements or activities within its field of view. This feature not only helps in reducing storage space by only recording relevant events but also enables instant notifications or alerts when any unusual activity occurs.
Remote access is another significant advantage offered by the Hikvision 16 Channel DVR. With its intuitive mobile application or web interface, you can securely access live feeds or playback recorded footage from anywhere at any time. This flexibility allows you to keep an eye on your property even when you are away, providing peace of mind and ensuring that you never miss a moment.
Furthermore, Hikvision offers a range of additional features that complement the 16 Channel DVR. These include intelligent video analytics, such as facial recognition, people counting, and intrusion detection, which enhance the overall security capabilities of your surveillance system. Additionally, Hikvision provides seamless integration with other security devices like access control systems and alarms for a comprehensive security solution.
In conclusion, the Hikvision 16 Channel DVR is a powerful and feature-rich solution for all your security and surveillance needs. With its support for multiple cameras, high-definition recording, advanced motion detection, remote access capabilities, and integration with intelligent video analytics, it offers a versatile and reliable platform for protecting your premises. Whether it’s for residential complexes, retail stores, offices, or any other establishment requiring robust security measures, the Hikvision 16 Channel DVR is an excellent choice to ensure safety and peace of mind.
Frequently Asked Questions About Hikvision 16 Channel DVR: Setup, Features, Mobile App, Hard Drive, Password Reset, and Video Output
- How do I set up a Hikvision 16 channel DVR?
- What are the features of a Hikvision 16 channel DVR?
- Is there a mobile app for viewing videos from my Hikvision 16 channel DVR?
- What type of hard drive is required for a Hikvision 16 channel DVR?
- How do I reset my Hikvision 16 channel DVR password?
- What type of video output does the Hikvision 16 channel DVR support?
How do I set up a Hikvision 16 channel DVR?
Setting up a Hikvision 16 Channel DVR may seem daunting at first, but with the right guidance, it can be a straightforward process. Here are the general steps to help you get started:
- Unbox and inspect: Begin by unpacking your Hikvision 16 Channel DVR and ensuring that all the necessary components are included. This typically includes the DVR unit, power adapter, cables, and any additional accessories.
- Choose a suitable location: Select an appropriate location to install your DVR. It should be well-ventilated, away from direct sunlight or extreme temperatures, and secure from unauthorized access.
- Connect cameras: Connect your cameras to the corresponding video inputs on the back of the DVR using coaxial cables or network cables (depending on the camera type). Ensure that each camera is securely connected.
- Connect peripherals: If you have any additional peripherals such as monitors or alarms, connect them to their respective ports on the DVR.
- Power up: Plug in the power adapter to provide power to the DVR unit. Ensure that it is securely connected and then turn on the power switch.
- Access setup menu: Connect a monitor or TV to one of the video outputs on the back of the DVR using an HDMI or VGA cable. Once connected, you should see the Hikvision interface on your display.
- Configure settings: Use a USB mouse (included with your DVR) to navigate through the setup menu and configure essential settings such as language preferences, date/time settings, network settings, and recording parameters. Follow the on-screen instructions provided by Hikvision’s user interface for guidance.
- Network setup: If you want remote access capabilities, configure network settings for your DVR so that it can connect to your local network or internet router. This step usually involves assigning an IP address and configuring port forwarding if necessary.
- Storage configuration: Set up storage parameters for recording footage. This includes selecting the recording mode (continuous, motion detection, etc.), setting up recording schedules, and configuring storage options such as internal hard drives or external storage devices.
- Camera configuration: Configure individual camera settings such as resolution, frame rate, motion detection sensitivity, and any other specific requirements you may have.
- Test and finalize: Once all settings are configured, test the system by monitoring live feeds and ensuring that recordings are being captured correctly. Make any necessary adjustments to optimize performance.
Remember to consult the user manual or refer to Hikvision’s online resources for detailed instructions specific to your DVR model. Additionally, it’s recommended to seek professional assistance if you encounter any difficulties during the setup process to ensure proper installation and functionality of your Hikvision 16 Channel DVR.
What are the features of a Hikvision 16 channel DVR?
The Hikvision 16 Channel DVR is equipped with a range of features that enhance its functionality and make it an excellent choice for comprehensive video surveillance. Some of the key features include:
- High-definition recording: The DVR supports up to 4K resolution, ensuring clear and detailed video footage.
- Multiple camera support: With the capacity to connect and manage up to 16 cameras simultaneously, the DVR eliminates blind spots and provides comprehensive coverage.
- Advanced motion detection: The DVR utilizes intelligent algorithms to detect motion within its field of view, reducing storage space by recording only relevant events and sending instant notifications or alerts.
- Remote access: The DVR can be accessed remotely using a mobile application or web interface, allowing users to view live feeds or playback recorded footage from anywhere at any time.
- Intelligent video analytics: Hikvision offers additional features like facial recognition, people counting, and intrusion detection, which enhance the overall security capabilities of the surveillance system.
- Integration with other security devices: The DVR seamlessly integrates with other security devices such as access control systems and alarms, providing a comprehensive security solution.
- Easy installation and setup: Hikvision 16 Channel DVRs are designed for user-friendly installation and configuration, ensuring a hassle-free setup process.
- Storage options: The DVR supports various storage options like internal hard drives or external storage devices for convenient data retention.
- Network connectivity: The DVR can be connected to a local network or the internet for remote access and management.
- User-friendly interface: Hikvision’s intuitive graphical user interface (GUI) makes it easy for users to navigate through settings, playback recordings, and configure various parameters.
- Backup options: The DVR offers multiple backup options such as USB drives or network storage devices for secure data backup and retrieval.
- PTZ control capability: Some models of Hikvision 16 Channel DVRs support pan-tilt-zoom (PTZ) control, allowing users to remotely control PTZ cameras for enhanced monitoring capabilities.
These features collectively make the Hikvision 16 Channel DVR a robust and reliable solution for effective video surveillance in various settings, including homes, businesses, and public spaces.
Is there a mobile app for viewing videos from my Hikvision 16 channel DVR?
Yes, Hikvision provides a mobile app called “Hik-Connect” that allows you to view videos from your Hikvision 16 Channel DVR on your smartphone or tablet. The Hik-Connect app is available for both iOS and Android devices, making it convenient for users of different platforms.
By downloading and installing the Hik-Connect app on your mobile device, you can securely access live video feeds and playback recorded footage from your DVR remotely. This means that you can keep an eye on your property or monitor surveillance cameras even when you are away from the premises.
The Hik-Connect app offers a user-friendly interface, allowing you to easily navigate through different cameras and access various features of your DVR. You can view multiple camera feeds simultaneously, zoom in for a closer look, take snapshots, and even control certain PTZ (Pan-Tilt-Zoom) cameras remotely.
In addition to live viewing, the Hik-Connect app also provides event notifications and alerts. If any motion is detected by the cameras connected to your DVR, you will receive instant notifications on your mobile device. This feature ensures that you stay informed about any suspicious activities or events happening in real-time.
To set up the mobile app for viewing videos from your Hikvision 16 Channel DVR, you need to connect your DVR to the internet and create a Hik-Connect account. Once the account is created and linked to your DVR, you can simply log in to the Hik-Connect app using your credentials and start accessing the video feeds.
With the convenience of the Hik-Connect mobile app, you can have peace of mind knowing that you have remote access to your surveillance system at all times. Whether it’s for monitoring your home or keeping an eye on your business premises, this app allows you to stay connected and in control of your security wherever you are.
What type of hard drive is required for a Hikvision 16 channel DVR?
The Hikvision 16 Channel DVR requires a specific type of hard drive for optimal performance and storage capacity. It is recommended to use a surveillance-grade hard drive designed for continuous read/write operations and optimized for video surveillance systems.
Hikvision DVRs typically support SATA hard drives, both 3.5-inch and 2.5-inch form factors. When selecting a hard drive, it is important to consider the following factors:
- Capacity: The capacity of the hard drive determines how much video footage can be stored. Hikvision DVRs usually support multiple hard drives, allowing you to expand the storage capacity as needed. Ensure that the selected hard drive has sufficient space to accommodate your recording requirements.
- RPM (Rotations Per Minute): Higher RPM generally indicates faster data transfer speeds, resulting in smoother video playback and quicker access to recorded footage. It is recommended to choose a surveillance-grade hard drive with a rotational speed of at least 7200 RPM.
- Cache Size: The cache size refers to the amount of temporary data that can be stored for quick access by the DVR system. A larger cache size can enhance system performance and improve overall responsiveness.
- Compatibility: Ensure that the selected hard drive is compatible with the Hikvision 16 Channel DVR model you are using. It is advisable to refer to the manufacturer’s specifications or consult with a professional installer or supplier for compatibility verification.
Additionally, it is essential to choose a reliable brand known for its durability and compatibility with surveillance systems. Some popular surveillance-grade hard drive brands include Western Digital (WD Purple), Seagate (SkyHawk), Toshiba (Surveillance), and HGST (Ultrastar).
Remember that continuous recording and high-resolution settings can consume significant storage space, so it’s crucial to select an appropriate hard drive capacity based on your specific needs and budget constraints.
How do I reset my Hikvision 16 channel DVR password?
Resetting the password for your Hikvision 16 Channel DVR is a straightforward process. Please follow the steps below:
- Locate the reset button: On the back panel of your DVR, you will find a small reset button. It is usually labeled “RESET” or “DEFAULT.”
- Power off the DVR: Ensure that the DVR is powered off by disconnecting it from the power source.
- Press and hold the reset button: Using a pointed object like a paperclip or pin, press and hold down the reset button.
- Power on the DVR: While still holding down the reset button, reconnect the power supply to turn on the DVR.
- Keep holding for 10-15 seconds: Continue pressing and holding the reset button for approximately 10 to 15 seconds until you see indicators such as lights flashing or hearing a beep sound (if applicable). This indicates that the password has been successfully reset.
- Release the reset button: Once you see confirmation that the password has been reset, release the reset button.
- Access default login credentials: After resetting, you can log in to your Hikvision 16 Channel DVR using default credentials. The default username is typically “admin,” and there might not be any password initially. However, it’s crucial to change these default credentials immediately for security purposes.
- Set a new password: Upon logging in with default credentials, navigate to system settings or user management section to change your password to a secure and memorable one of your choice.
Remember to keep your new password in a safe place and avoid using easily guessable combinations for enhanced security.
Please note that this process may vary slightly depending on your specific model of Hikvision 16 Channel DVR. It’s always recommended to refer to your device’s user manual or consult Hikvision’s official support resources for precise instructions tailored to your system model.
What type of video output does the Hikvision 16 channel DVR support?
The Hikvision 16 Channel DVR supports various types of video output options to cater to different display devices and requirements. Some common video output options provided by Hikvision 16 Channel DVRs include:
- HDMI Output: This allows you to connect the DVR directly to an HDMI-enabled monitor or TV, providing high-definition video output for clear and crisp display.
- VGA Output: The DVR also supports VGA output, which enables you to connect it to a VGA-compatible monitor or display device.
- BNC Output: In addition to HDMI and VGA, the Hikvision 16 Channel DVR typically includes BNC (Bayonet Neill–Concelman) outputs. BNC connectors are commonly used for analog video transmission, making it compatible with older CCTV monitors or specialized surveillance equipment.
These multiple video output options ensure flexibility in connecting the DVR to different types of displays, allowing you to choose the most suitable option based on your specific requirements and available equipment.